
A seriously old Finding Pause blog that I pulled out of the archives… if you can find white eggs and some onion skins. It is a great #stayhome project. Big love, beautiful people.
**************************
I love dying Easter eggs. It may be the youngest child in me. A friend just told me that as the oldest of many children, she was always playing helper to the little ones dying eggs. Now she hates it. So, depending upon your birth order, perhaps, or the things that bring you joy or not, or your religion or lack thereof, or your life, your schedule, or perhaps if you are vegan, depending upon many things, you may or may not be interested in this post. Yet, even for those of you who don’t dye eggs, or hate to dye eggs, especially with those little tablets from the grocery store, read a little further for possibly a new take on making Easter eggs. You may even be inspired to make something else with the miracle of onion skins.
Every year, without fail, I make onion eggs. They are the most beautiful eggs I have ever seen, and we do spend our time making Ukrainian eggs and other fancier types of eggs at our house. Still, for me, the onion eggs win, hands down every time, as the most beautiful, and satisfying egg dying experience ever.
Here’s how you do it:
1) Go to the grocery store. Root around in the yellow onion bins, collecting all of the onions skins available, the ones lining the bottom of the bin. The messier the grocery store, the better. Whole Foods doesn’t exactly have many random skins. You can also talk to the produce person and ask for skins. They have them, in all of the crates in the back, for sure. (And I know this is more challenging in our COVID times, so you can just buy 1-2 bags of yellow onions.) Then buy a dozen white eggs.
2) Lay out your onions. Get a knife. Remove the dry outer skins, not the inner wet stuff, just the brownish, yellow outer skins. Get those onions naked. Place skins in a bowl.

3) Cover skins with cool water and plunge skins down under the water. Really soak them. Allow them to sit for about 15 minutes, periodically pushing hand into water, making sure to soak all skins.

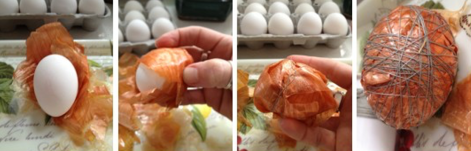
4) With your bowl of skins, go to a happy little work area you like, where you can sit down. Bring your raw eggs, an empty pot that can hold all of the eggs, a spool of thread, and a pair of scissors.
5) Take one egg. Wrap wet skins, one piece at a time, around it in a tidy or messy fashion, but trying to get skins as close to egg as possible. You can take small bits, place on egg, and cover with bigger bits, just scrumple them up and smash them around the egg, or very carefully wrap eggs neatly. I do a combination of all three, and never really know which is better in the end. The beautiful veins in the skins are good to lay across egg neatly in some places, for sure, as are messy clumps as they make for a more marble look. The real trick is to cover egg completely. (If you have any skins with black spots, rip off the black spot part and throw it away.) Keeping thread attached to spool, begin wrapping it around skin and egg, using it to pull skin closer to egg. Really wrap string, in all different directions being mindful in your handling that the egg is still raw, eg, don’t crunch it. Once skins seem secure and snuggly on your egg, cut string and try to finagle it under one of the other wrapped strings to tie it off. But don’t get too caught up in this; they are unlikely to unravel. Place egg carefully in the bottom of your empty pot.
6) Do all of your eggs, the same way.
7) Cover eggs in pot with water, less than an inch above them. Add a tablespoon of distilled vinegar, or apple cider, probably anything but balsamic would do. Cover. Bring pot to a boil. Reduce heat. Simmer for 10 minutes. Turn off. Let sit there for about 3 hours.
8) Take pot to sink. Cover with cool water, rinsing and flushing. Drain water. Go back to your nice seat. Bring a shallow and pretty bowl (I prefer white), your scissors, some newspapers as placemat, and a cloth rag.
9) Pick an egg, any egg. Begin to unwrap the string. You can cut it carefully with scissors, or even a seam ripper, or just find the beginning of the thread and slowly unwind, whichever is easiest and/or brings you the most pleasure. Then carefully peel away the onions skins. Sometimes using a little running water can help if they are really stuck on the egg. Wipe clean.
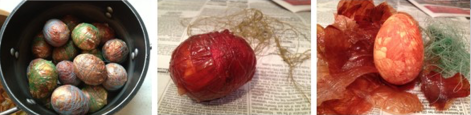
10) Lo and behold, you will hopefully uncover one of the most beautiful eggs you have ever seen. Place in pretty bowl. Go for egg number 2, then 3, then 4, and so on. Rinse them off as necessary. Ooh and ahh over each egg, because they are totally worth it, even if you are the oldest child and dyed too many damn eggs in your life with small children, even before you had your own.
11) Place your pretty bowl full of pretty eggs somewhere you can admire it. Not forever, but for a few hours or so. I think even hard boiled eggs need some refrigeration, that is, if you plan to eventually eat them. Treat them the way you would normally treat a hard boiled egg. I can never eat them, way too pretty to crack, so we leave them out. This may be a horrible wasteful move, but the pleasure they bring sitting on our counter for the days before Easter, is way more satisfying than any egg I have ever eaten.
